Showing posts with label crafts. Show all posts

May 26, 2010

Easy Spring/Summer Wreath


This is a very easy way to spruce up any door, and it can be made very inexpensively as well.

I picked up a wreath like this from Michael's
Have you noticed how popular eggs and birds are? So I decided to put some of these speckled eggs on .
Then I just got some flowers and cut them into individual pieces
Then I just stuck in the flowers were I wanted them and placed the eggs were I though looked good, and hot glued them on.

Here is a close up:

May 21, 2010

Necklace Holder


(I measure the hooks out 1 inch apart. I marked the wood with a pen to make sure they were straight and even in a row)


I was really needing something to do with my necklaces. This is a really easy and cheap solution. I used some leftover wood from a project my husband had been working on. It is about 1 inch thick and about 2 feet long. I bet you could get some scrap wood at Home Depot or Lowes that would work for this for free. I sanded it a little bit, then painted it black to match my bathroom. I bought a pack of 50 hooks at Walmart for about $2.50. I only used about 20 of them. Then I just got a leveler to make sure it was straight and hung it up. I used two long nails in the end to hang it up because I was afraid that a screw at the end of the board might split the wood. I wanted to make it really secure, so I did put one screw in the middle and it didn't split it.
Like the scrapbook picture frames? Click HERE to see them.

I am linked to THESE parties.

May 18, 2010

Stone Wreath

Tuesday again and the feature this week is from Craft Envy. I love the Stone Wreath look, and it was under $5 to make. How cute. Click HERE for the tutorial.


May 12, 2010

Ginormous Chalkboard


Sorry, I've been busy and missed Tuesday, but still wanted to feature a cool blog, and the feature this week is Joy's Hope. She did this post awhile ago and I loved it. The second I have a enough wall space somewhere, I want to make a 'ginormous chalkboard.' I like how she has the trim around it and the pictures hung up with the clothes pins. so cute! Anyway, here is her blog button:


and HERE is the direct link to the tutorial

May 09, 2010

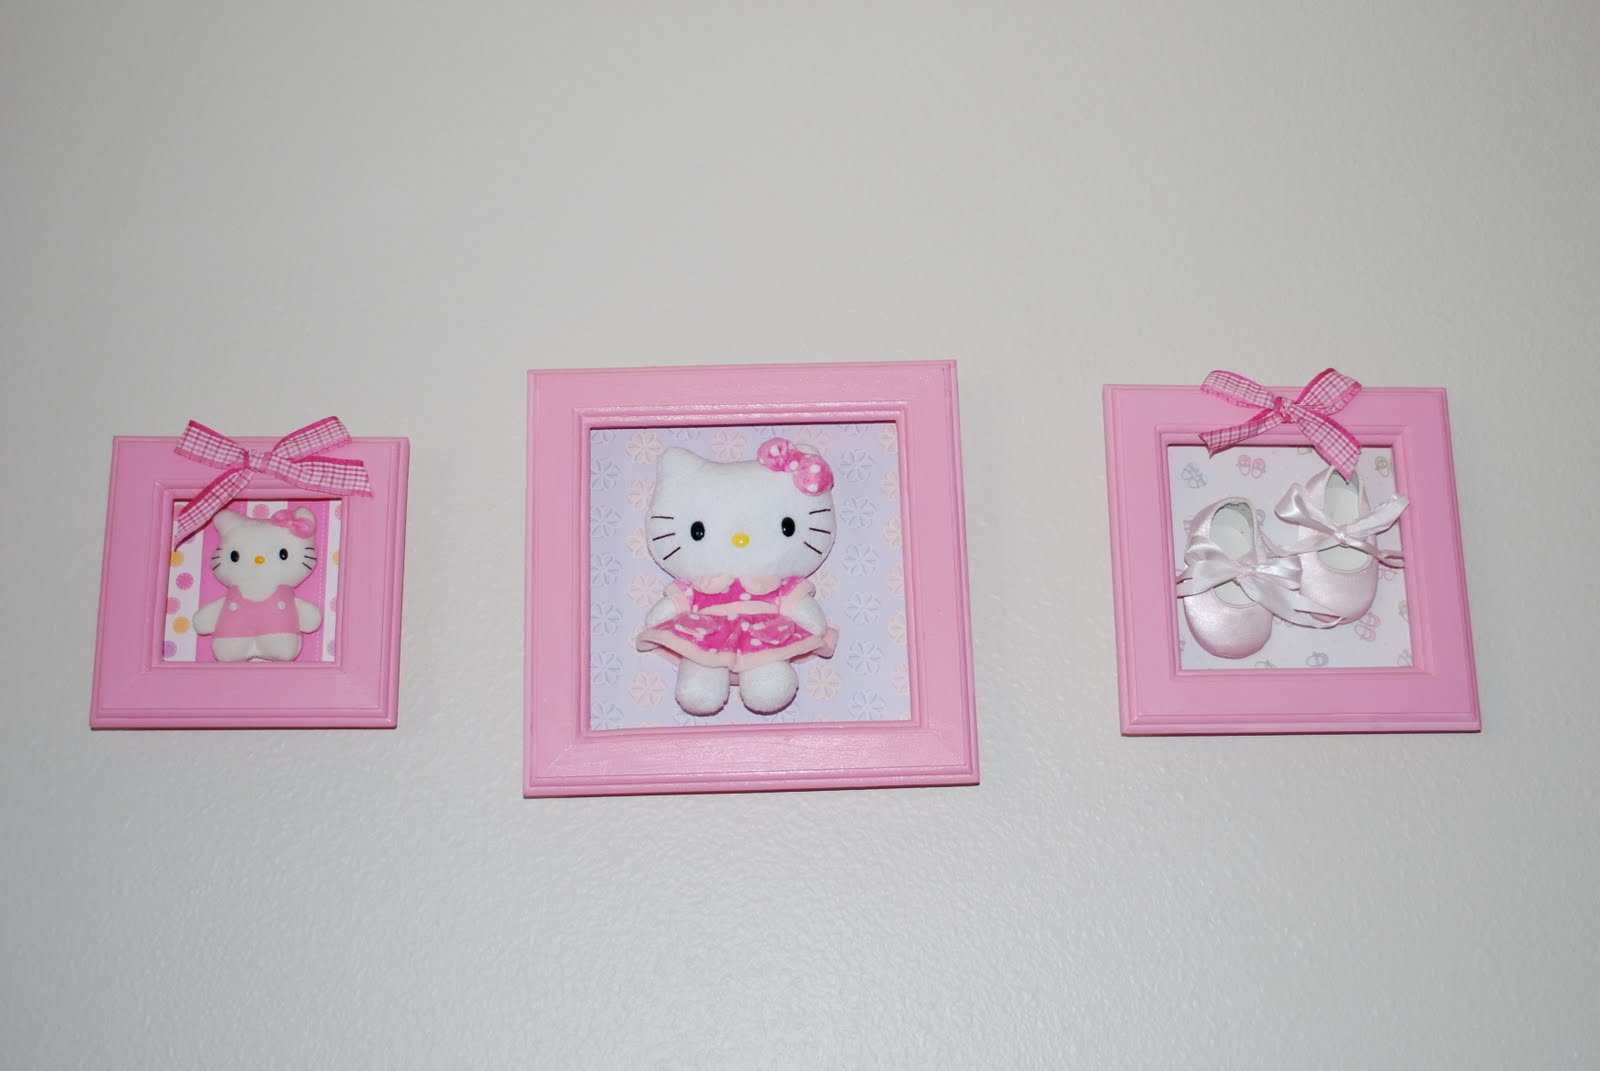
Shadow Boxes

So I think I pretty much got the blog back to normal for the most time and pretty quick too. My Mom is opening an etsy shop in a couple weeks, so I will be doing my first giveaway then for something from her shop. She makes homemade bows, headbands, jewelry and lots more so stay tuned! Here are my shadow boxes.


I got a pack of three wooden shadow boxes at Michaels. I painted the frames, traced the back part of the frame onto scrapbook paper. I mod podged the scrapbook paper on the back. When everything was dry I hot glued the little decorations inside. My girl's room was in Hello Kitty, so I used to little stuffed animals and a pair of baby ballet slippers. My boy's room was in sports, so I used a sporty Snoopy stuffed animal and some sports balls. Pretty easy room decorations and pretty cheap. You could fill the shadow boxes with more meaningful stuff as well. My friend, called her's 'Memory boxes', and put in her new baby's hospital bracelets and little hospital hat, some pictures of the newborn baby in the hospital and stuff like that that reminds her of the birth. A very cute way to display all that stuff that is a little bulky for a scrapbook, but still precious keepsakes.

May 01, 2010

Going on a Trip Presents


So JUST me and my little baby went on a short weekend trip (for a family event) to Utah, leaving my husband and two other kids at home. Fearing that this might be a problem for the two kids (I've never left them before), I came up with a GREAT idea. I shopped around in the dollar section at Target (but the Dollar Store, Walmart, or anywhere will do, really), and found them a cool small little thing. Then I grabbed some lunch sack type gift bags and made them all (not forgetting the hubby), a little present to open each day. It was a BIG hit and the kids (they knew of the presents but not what was in them) kept asking me to leave early so they could open the presents. Examples of things I got (just FYI) were: playdough, Styrofoam dart gun, sticker scrapbook, harmonica (hey, I wasn't going to be there), little candy or crackers, ect, all found for $1 each. Then I labeled them so they knew who they were for and for which day. Really fun for the kids, and fun to have them tell me all about it on the phone. Only downside...this has now set a precedence for all future trips. oh well.

April 27, 2010

Burlap Dollar Store Wall Grouping

It's Tuesday again and I am keeping with my new tradition of featuring something I saw during the week that I think is awesome. These wall hangings cost $6 to make and Jen from Tatertots and Jello made them. They are four 3.5 x 3.5 frames from the dollar store that she covered in burlap, used old music scrapbook paper for the inside, and printed off the first initial of each of her children's names to frame. Don't forget the ribbon she added to hang them. Very cute, I love the idea and so easy and cheap to make. See the full tutorial HERE.

Visit tatertotsandjello.com

p.s. If you have an awesome craft, recipe, mom tip, ect. you would like featured on my blog, let me know. Thanks.

April 26, 2010

Felt/Sweater Flowers

Sorry this post didn't come up right, anyway, here is is now:

The flower my Mom made out of an old sweater


Here is the felt flower I made:

To make it, first trace a circle onto felt, whatever size you like:
Then, cut it in a spiral pattern, it will look like this when you are done:
Then pinch the center part together, and start rolling it up:
You can hot glue it a little here and there as you go, or wait till you are done and then hot glue it. Here are some ideas you can do with your flower from a cute blog call One Little Minute:

Click HERE to see the full post at One Little Minute, Miranda has some other felt flower ideas that are really cute!

I am linked to these parties

April 21, 2010

Easy Kid's Apron


My friend let me borrow an apron she got at a church activity. It is so cute and really easy to make. You just need one long dish towel and some ribbon. Then you just need to sew two straight lines, as you can see in the last picture. I would recommend measuring how much ribbon you want for the part that goes around the child's head, then sewing the ribbon down because it kept sliding out.

April 20, 2010

Storage Boxes

I saw these storage boxes on Make it and Love it, (which is AWESOME), and I thought they were the coolest things. They were one of those things that when I saw them, I thought "Why didn't I think of that?" They look so easy and inexpensive to make. They are made by hot gluing cardboard box pieces together, then mod podging fabric on the front. I literally walked around my apartment looking for something or somewhere to put these; hopefully I'll have a little more room to work with in a house someday.

makeitandloveit

p.s. I decided that every Tuesday I will be featuring an awesome craft, recipe or mom tip that I find in other blogs because I think that good ideas need to be shared. If you have an awesome craft, recipe, tip or something along those lines that you would like featured, let me know!

April 17, 2010

Birthday Board


This was something that was bought, but I thought it was so cute and could easily be remade. It is a board that was painted and has vinyl lettering, and then ribbons. It came with mini pop-sickle stick type things to wright the name of the person and the day of their birthday, but you could use whatever. I was wondering if they had anything at a craft store like a square metal bead type thing that you could even put a picture of the person in. If you don't want to do vinyl, you could use paint and stencils, or even some stickers and mod podge over it. Anyway, I just thought it was super cute!

April 16, 2010

Glass Gem Vase


This was a project my Mom did and it is so easy and cheap. You can do it with different colors to match any room or theme. You just need a glass vase and glass gems (like you might put in the bottom of a fish tank). I have seen them at Wal-mart, the dollar store, and Michael's, so I think they are pretty easy and cheap to find. Then you just hot glue them on. You can start around the base and just go up, or try and create cool patterns. Put some flowers in and you are good to go!

I am linked with THESE parties.

April 13, 2010

Homemade Fairy Wings


Make your own fairy wings; here is what you need:
2 wire hangers
Pair of tights (whatever color)
Ribbon
Elastic (to make the arm bands)
Duct Tape
I looked online and found an excellent tutorial HERE that I thought I'd put up because no pictures were taken of these being made. The only differences are that she used the extra part of the tights to make the arm bands, and my Mom (who made these) used elastic. My Mom also wrapped thick ribbon around the middle part of the wings to hold in the elastic and cover up the hangers as well. She decorated them with fabric glitter glue.

April 09, 2010

Yo-Yo Hair Barrettes

Black one with rolled rose and black tulle in center (has pearl and rhinestones in center of yo-yos)
Green one with feathers and white fabric in center (metal embellishments in center of yo-yos)
Red one with feathers (button and metal embellishment in center of yo-yos)
Brown one with feather and white netting, rolled rose in center with rhinestone, pearl, and metal gem embellishments in centers
the backs
She put them all together with a hot glue gun. Good luck, I'd love to see pictures if anyone makes them!

linked to:

Making

April 06, 2010

Silhouette Portraits

Here are my three silhouette portraits:

Now I hear you can make these pretty easy with photoshop, but for those of us who DON'T have photoshop (me), here is the I did it, and it really was SO easy!

Total Cost: About $4
Supplies:
Frames
mod podge
the silhouette print outs
white cardstock (or whatever color you prefer)
black paint (if you do it my way)
First, obviously, you need to take the silhouette pictures. I would take like 10 or so because it is hard to tell if you have exactly the right angle. Also, it is easiest to take them against a white wall or such for when you are cutting them out. Here are what my pictures looked like:

Now, you have a couple options next, depending on what size you want your portraits to be. (I wanted mine to fit in 5x7 frames). For my pictures, I messed around with the exposure, contract, saturation, all that stuff, until I felt the outline was really defined and they would be easy to cut out; however, it is not really necessary, you could totally just a) either print out the picture in whatever size you like and actually cut the photos, or b) print them out on computer paper.

Which is what I did. I cropped them into 4x4 inch squares, and printed them on computer paper and cut them out. I totally planned on tracing them onto nice black paper, but the cutting took a little time. I wanted to get all the fly aways in my baby's hair (which you would totally want to do, get loose hair ends, eyelashes, collars, anything cool for the silhouette) and it was a little tedious, that I decided once was enough, so here is what they looked like when I printed them out:
And after I cut them out:
After you cut them out, make SURE they fit into the frame you want, I guess really before you cut them out would be ideal. Sometimes you think they fit, but they need a little more room. I was originally planning on putting them in 4x4 inch square frames (hence why I cropped them to that size) but they looked so much better in the 5x7 frames with more white background.

Then I actually just painted the computer picture printouts with black paint and let dry. They will curl a little bit, but it's okay. If you want them on something sturdier, you can trace them, but you can't even tell they are on computer paper once they are done, so I wouldn't bother unless you really want to.
Then I bought some nice white cardstock paper at Michael's for $.69, (one sheet did all three of my 5x7, just FYI). I put a very smooth layer of mod podge on the white paper where the silhouette would be, then very carefully put the picture on, making sure to smooth it out and make sure it is all glued on. Then let it dry for a couple minutes and carefully mod podge all over. It will look like this until it dries:
When they are completely dry, (which really doesn't take long) frame them. I really liked the thick black frame with it. But really you could do anything.
I really wanted to find three really different antique looking frames to put them in, like below, but I also wanted to keep my budget, and I found my frames at the dollar store.


Linked to:


 http://www.thethriftyhome.com

Make it Yours @ My Backyard Eden

Life in the Pitts


giveaways

Get your craft on Thurs.

Transformation Thursday


LinkWithin

Related Posts with Thumbnails